Thundax P-Zaggy v1.1 beta (Bugs Fixed)
After few days working with the Application I've discovered some interesting bugs that needed to be fixed as soon as possible in order to increase the productivity of using the program. That's why I'm releasing the version 1.1 with very good improvements. I've also tested the efficiency of the drawing system creating a graph with more than 400 nodes and 800 edges. And it was totally successful without any feeling of loosing power. You can see the list of bugs into the bug tracker, and add one if you've noticed that anything goes wrong.
In the next video you'll see the power of the application trying to solve a large of complicated connected nodes that are composing a net. You can test by yourselves by downloading this simple test "test.txt" from SourceForge and going to Graph -> Graph Script Implementator and copying the downloaded list. After that you only have to click on the red bolt, but before that be sure to have configured correctly all the parameters referring to the layout system.
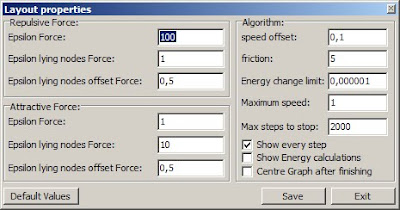
As for this example, my configuration is the following one:

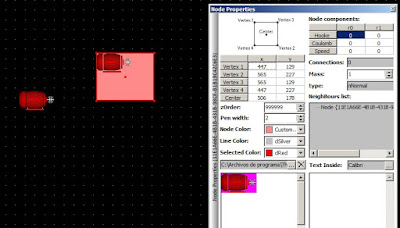
I've also fixed the correct drawing of the imported images. Now you'll see the images with a transparent background:
 I've changed the background colour to one that's known, for example fuchsia, and then I only need to get the pixel located in the [0,0 coordinates] and use it as the transparent colour. After that, we only need to scan the picture and change the colour of the pixel.
The coding of the transparent image would be something similar to this:
Automation Object Library for Vijeo Citect.
In the next video you'll see the power of the application trying to solve a large of complicated connected nodes that are composing a net. You can test by yourselves by downloading this simple test "test.txt" from SourceForge and going to Graph -> Graph Script Implementator and copying the downloaded list. After that you only have to click on the red bolt, but before that be sure to have configured correctly all the parameters referring to the layout system.
As for this example, my configuration is the following one:

I've also fixed the correct drawing of the imported images. Now you'll see the images with a transparent background:
 I've changed the background colour to one that's known, for example fuchsia, and then I only need to get the pixel located in the [0,0 coordinates] and use it as the transparent colour. After that, we only need to scan the picture and change the colour of the pixel.
The coding of the transparent image would be something similar to this:
I hope you enjoy!. Don't forget to leave a comment if you've tested the application!.
if (FImage <> '') then
begin
  Bitmap := Graphics.TBitmap.Create;
  Bitmap.LoadFromFile(ExtractFilePath(ParamStr(0)) + Self.FImage);
  Bitmap.Transparent := true;
  Bitmap.TransparentColor := Bitmap.canvas.Pixels[0, 0];
  Bitmap.TransparentMode := tmFixed;
  canvas.Draw(ClientToGraph(Vertex1).x, ClientToGraph(Vertex1).y, Bitmap);
  FreeAndNil(Bitmap);
end;
- Related Articles:
Automation Object Library for Vijeo Citect.
%20applied%20to%20Transformer%20models%20in%20machine%20learning.%20The%20image%20shows%20a%20neural%20networ.webp)

Comments
Post a Comment